Despite the fact that my capstone thesis was complete over
three months ago, it’s been a struggle to make this post. That being said, hopefully this blog post doesn't appear too much like a paper, but it was pretty hard to avoid doing. The full paper, as of right now, is not publically
available, but hopefully will be some time in the near future. Please reach out with any questions relating
to the research, the subject, my process, or anything.
Although it was previously highlighted in my prior blog
posts, I feel that it is necessary to outline the importance of this research
again with a little more detail.
Note: Clicking the pictures will enlarge them. I formatted most easy enough to read, but some need enlarging.
Note: Clicking the pictures will enlarge them. I formatted most easy enough to read, but some need enlarging.
Why is this important
to us?
Technology is an ever-evolving
creature. In the world of digital
forensics, attempting to keep up to speed with the constant changes is an
absolute must. Doing so will make not
only for a better investigator, but a greater impact on the work that needs to
be done. With the recent boom in the terms
“cloud computing” and “virtualization,” digital forensic examiners find
themselves needing to immerse into a new era of the investigation age. According to the State of SMB IT Report,
written by Spiceworks, the trends in the adoption of virtualization and cloud
computing have been on a constant rise.
Moving back to the first half of 2010, 44% of small to midsized
businesses (SMB’s) were using virtualized products. Progressing forward, it is estimated that nearly
79% of SMB’s will be using virtualized platforms, (Sweeney).

Figure 1: State of SMB IT Report, November 2012,
Spiceworks (Source: Sweeney)
With such a dramatic increase in
the implementation of virtualized software, it is extremely pertinent that
digital forensic investigators begin to understand the logic of the systems and
what evidence can be found on them.
Two of the most common companies
that investigators will see in practice are VMware and its patented VMware
Workstation, as well as Citrix and its XenDesktop and VDI-in-a-Box
platforms. The low long-term cost of
these products allow for small and large companies alike to implement and
maintain these technologies. According
to Phil Hochmuth of Forbes, “Providers of VDI technology say their systems can
save between 30% and 50% of the current cost for IT administrators to manage,
patch, upgrade and support employees' PCs in a client/server environment. By
some estimates, this could cut the annual per-desktop support cost from around
$530 to $376--a savings which can add up for the larger the organization,” (Hochmuth). With an increased return on investment,
companies that deploy VDI’s will quickly advertise and transition partner
companies to similar technologies.
Unfortunately with all good comes
some bad and implementation of cloud computing is no different. As virtualization becomes more prevalent in
business practice, malicious code and malware will quickly take a turn towards
attacking cloud computing. “Attackers
will go where users go, so it should come as no surprise that mobile platforms
and cloud services will be high-risk targets for attacks and breaches in 2013.
The rapid rise in malware on Android in 2012 confirms this,” (Powledge). As attackers move towards cloud services and
online platforms, it becomes more necessary to not only secure them better, but
to be able to analyze and examine what happened after an attack and where
vulnerabilities lie. According to
Symantec, “the median cost of downtime for an SMB is $12,500 per day,” (Powledge). If a small sized business can lose this much
money while being down for such a short period of time, imagine the
ramifications if a large company like Amazon was hit for even two hours. It simply cannot be overstated enough;
digital forensic examiners must be prepared for this to happen as it is
inevitable.
So, what are virtual
desktop environments?
A Virtual Desktop Infrastructure is
simply cloud computing. Virtualization changes the information
technology work place. Desktops and
workstations can be set up, configured, and dispersed in merely minutes instead
of hours or days. Costs are reduced
after initial investment while security and machine integrity are
increased. The user experience becomes
easier than before, allowing for employees to remotely connect and work from
anywhere. Centralized storage provides
administrators and incident responders with a plethora of information at their
fingertips in the event of an emergency or breach.
An extremely popular company in the
VDI business is Citrix. Through their
products of XenDesktop, XenApp, and VDI-in-a-Box, Citrix has emerged as a
forerunner, and major companies all over are to use their products. According to Eric Savitz of Forbes in his
article entitled Citrix Shares Rally As Q4 Results Crush Street Estimates, “the
enterprise software company posted revenue of $740 million, up 19% from a year
ago, and ahead of the Street consensus at $705.7 million,” (Savitz). It’s rather clear by these numbers that the
investment into cloud computing is booming and that all sizes of companies are
transitioning. Citrix is among the top
in VDI providers, and as such, is the focal point of this research.
Now we understand why
this is important and what they are, so what am I doing?
VDI-in-a-Box is a unique toolset
that provides a network administrator with all of the tools necessary to deploy
a VDI to a business. Through the use of
only a few physical machines, VDI-in-a-Box can be successfully setup and
running in a very short time. Considering
small to midsized businesses are the target audience for this product and that
so many are making the transition already, VDI-in-a-Box version 5.2.0 is the
software that is being analyzed.

Figure 2: Citrix VDI-in-a-Box Version 5.2
How did I go about
doing this then?
Acquisition of a Citrix Virtual
Desktop Infrastructure required a great deal of trial and error. Due to being unable to use some of the
enterprise level tools because of licensing limitations, or the software not
supporting remote imaging of a server, Windows Secure Copy (WinSCP) over port
22 was used to capture a live image.
The XenServer itself, being the
physical hypervisor, was the primary target to acquire in hopes of finding all
the virtual machines stored on it.

Figure 3: XenCenter VM Pool
WinSCP is a program that gives a
user a graphical user interface to the secure copy protocol and will allow a
choice of what information to copy. By
entering a server address and administrative credentials, WinSCP will create a
secure connection to a remote location allowing information to be viewed or
duplicated.

Figure 4: WinSCP Login Prompt
Once logged into the server, WinSCP
will provide the user with a side-by-side view of both the remote machine and
the local machine. At this point, the
entirety of the server folder structure was copied over from the server in an
attempt to create the closest to a logical image as possible.

Figure 5: WinSCP File Transfer Session
It is important to note that
multiple errors occurred while copying files and folders from the server to the
examination machine. These errors would cause
the file being copied to fail and not copy successfully. The errors would typically read either “Can’t
create file…” or “…not a regular file.”

Figure 6: "Not a regular file" error
message

Figure 7: "Can't create file" error
message
Although there were errors on the
transfer, it did complete successfully and allowed for examination of the
drive. The most important item for
review were the virtual hard disks (VHD’s) that contained information relevant
to the golden images as well as virtual machines that had been created.

Figure 8: Virtual Hard Disk Storage Location
These virtual hard disks are stored
in a location determined during the initial setup, and in this project they
were located at /var/run/sr-mount. Each
VHD is listed by a universally unique identifier (UUID). These UUID’s can be related back to specific
machines in different ways. If access to
the Citrix vdiManager is available, each virtual machines general properties
will list its UUID. This will be
extremely helpful when working with personal desktops as the VHD’s will not be
deleted, therefore finding the UUID through vdiManager would be a simple task. When working with pooled desktops, however, the
VHD files are destroyed after the machine is shut down.
Pooled virtual hard disks being
destroyed was an obstacle that was easily overcome by the use of
snapshots, thus the virtual hard disks are now not destroyed. Much like VMware, Citrix allows
for the use of snapshots.

Figure 9: XenCenter Snapshot View
Each of these snapshots will create
two VHDs. The user can determine which
VHD’s are snapshots by a command via the XenServer command line. From the root directory of the drive, the
command xe vdi-list is-a-snapshot=true will prompt a list of all virtual hard
disks that are snapshots.

Figure 10: XenServer Snapshot List by Command Line
Instruction
The list of snapshots that is
returned will provide the UUID of each snapshot, a label of the golden image
that it was generated from, the storage repository UUID that is holding the
snapshot, and the virtual size of the snapshot.
To verify that this command was accurately creating a list all snapshots,
a new snapshot was taken and the command again was run again. This appended a new entry to the end of the
list, and also created two new VHD’s on the server.

Figure 11: New Virtual Hard Disk Creation

Figure 12: New Snapshot Verification
When using Citrix VM Protection and
Recovery, two types of snapshots can be taken with three different scheduling
options. Disk-only snapshots can be
taken that will “store the VM's disks (storage) and metadata. They are
crash-consistent and can be performed on all VM types, including Linux VMs,” (Citrix
EDocs). Disk and memory snapshots are
also available which will “save the VM's disks (storage), metadata, and its
current memory state (RAM),” (Citrix EDocs).
Once the decision is made to either perform disk-only or disk and memory
snapshots, the administrator must choose whether to do hourly, daily, or weekly
snapshots. In any event, the snapshot
retention policy is limited to a maximum of 10 scheduled snapshots or until
archived, automatically deleting the oldest one when this number is exceeded.

Figure 13: Citrix VM Protection and Recovery
A daily or weekly archive schedule
can then be configured, independent from the scheduled snapshots, which will
archive all scheduled snapshots to a remote location for storage. Alternatively, all snapshots can be
automatically archived if the administrator wishes. When examining the archived virtual hard
disks, each archive folder is given a specific name. This naming convention will always be the VM
name followed by the first sixteen characters of the UUID. For example, if the VM name is Win7 and the
UUID is 6a88edee-5b42-453a-a60d-4605c689f338, the archive folder will be Win7_6a88edee-5b42-45. “This folder contains archived VM files, in
the YYYYMMDD-HHMM.xva form,” (Citrix RSS).
Depending on how this is done, the
investigator will need to link a user to a specific snapshot to alleviate the
need to sift through what could be hundreds of snapshots. One method would be to examine each virtual
hard disk file individually. Although
this will take quite some time, it will still provide accurate results. One benefit to this method is that no
information will be overlooked in the event that the suspect was using another
user account or username.
On the domain controller with
XenCenter installed, running the command “xe vm-list –s <server> -u
<user> -pw <password>” provides a list of all virtual machines currently
being run. The virtual machine
vdiManager_Xen is the interface that the administrator interacts with to
initially configure the server, the machine that keeps activity logs, and the
web portal that users must access in order to spawn a virtual desktop.

Figure 14: XenCenter Command Line VM List
Still being SSH connected into the
XenServer, under the directory /var/run/nonpersistent/xenops/VM, the
investigator can locate and view the configuration files for the vdiManager. This will point to the virtual hard disk that
retains these records.

Figure 15: vdiManager Configuration File
This configuration file will first
list the same UUID found when the XenCenter command was used. In the middle of the log is the VDI UUID,
with the storage repository UUID being listed, followed by \/, and then the
vdiManager’s UUID. Within the
/var/run/nonpersistent/xenops/VM directory are two files, vdb.xvda and
vdb.xvdb. The first of these (.xvda)
will correspond this information again, linking the two UUID’s.

Figure 16: vdiManager Virtual Hard Disk Verification
Once this is achieved, examination
of the virtual hard disks can begin. The
investigator should now be able to extract and examine the vdiManager machine
as well as all of the snapshots that were taken. Unfortunately, when examining a VHD in EnCase,
it is not recognized as a normal operating drive and therefore does not have
any form of folder structure. Rather, it
is all listed as unallocated and must be manually parsed.
What can I find from this?
There is a great deal of
information that is recoverable from the XenServer. Some of these files are relevant to the
server itself and will depict information about the XenServer, while others
reflect the vdiManager. A plethora of
virtual machine information is also recoverable as long as a snapshot is present.
The first file of interest from the
XenServer is xensource-inventory, located in /etc. This file contains information related to the
actual server itself and would be useful in an investigation. The installation date of the server is
recoverable, but more importantly, the primary disk and backup partition
locations are located within this file as well.
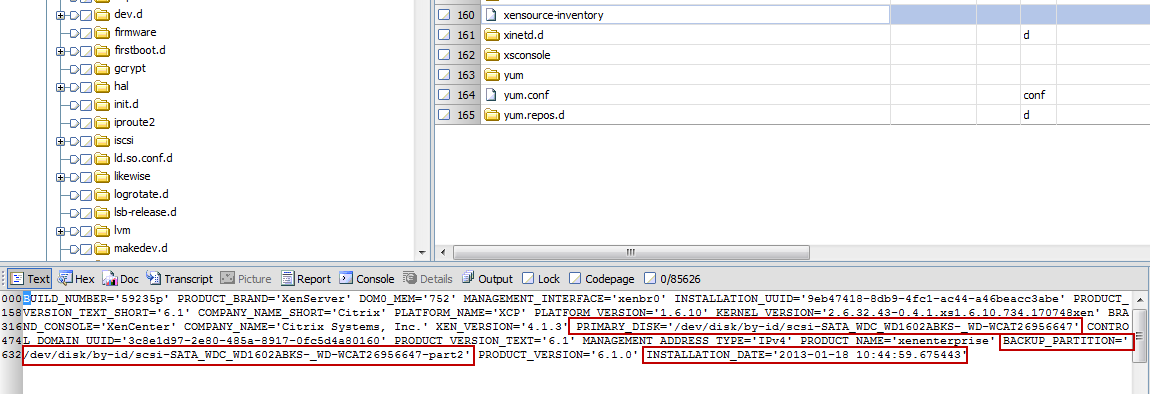
Figure 17: XenServer Disk and Installation Details
The next file of interest is
located again in /etc and is the timezone file.
Considering time zones are extremely important to any forensic
investigation, examining this artifact will be very helpful as it lists in
plaintext the time zone that the server is set for.

Figure 18: XenServer Timezone Details
The last file pertaining to
information from the server is the bash history. Bash is a unix command-line interpreter, or
shell, that will allow for a user to input commands and information into a
system. It is comparable to the Windows
command line. The bash history can be
located at /root and is named .bash_history.

Figure 19: Bash History
When
examining the vdiManager virtual hard disk, the investigator is capable of
pulling all users that were associated to the drive, what templates the user
was assigned to, the groups the user was a part of, the user’s ID in Citrix,
and more.

Figure 20: vdiManager User
Entries
This
VHD also contained logs in reference to the spawning of virtual machines,
including the time and date that it was created. The log will list the user that connected,
the machine IP address that the connection originated from, the template the
user logged in with, and the MAC address that the created virtual machine was
given.

Figure 21: vdiManager User Connection
Further
investigation of these logs provides more information on user interaction with
virtual machines, specifying when a user logged both in and out of a desktop,
what IP address it was given, what template it was provisioned from, and what
vdiServer it accessed.

Figure 22: vdiManager Connection Log
This
log file is also able to be obtained via the vdiManager web portal. Within the admin menu is a View Audit Log
function that provides an excel spreadsheet containing user activity.
Virtual Machine
Files
The virtual hard disk files are the
focal point of investigation when attempting to uncover information from
non-persistent machines. The
non-persistent VHD’s will be destroyed when the reset policy is set, either at
logout or on a schedule. Due to this,
snapshots of these hard disks are necessary to uncover potential evidence.
Each virtual hard disk contains a
header that points to its parent drive.
Although EnCase was listing these pointers at the beginning and making
it relatively easy to navigate between, server-side verification of this was
completed. Running the command xe
vdi-list params will provide a list of metadata about each virtual hard
disk.
Figure 23: VDI-List Parameters
Command
This command can populate a list
that will tell the user the UUID of the virtual disk, whether it is a snapshot
or not, the time of the snapshot if one was taken, the number of snapshots
taken, and the virtual hard disks parent.

Figure 24: Parent UUID Verification
By proving that the virtual disk
with the UUID of b54cb669-f4e6-44a9-8b97-2038aa7ea7a2 has the parent with the
UUID of 8edd0321-2f59-4fcb-9a1e-634fd5d68d37, the results being displayed by
EnCase were verified and thus trustworthy.

Figure 25: EnCase Parent UUID
Correlation to XenServer Verification
As previously mentioned, there are
two virtual hard disk files associated with each snapshot. The first of these disks is the identity
disk, which will typically range up to sixteen megabytes and simply provides
each VM with a unique identity. The
second disk, referred to as the difference disk, is “used to store any writes
made to the VM. The disk is thin
provisioned (if supported by the storage) and will increase to the maximum size
of the base VM if required,” (Feller).

Figure 26: Disk Creation (Source: Feller)
Review of the identity disk yields just
a pointer UUID to the difference disk associated with it. The difference disk contains content from the
virtual machine as well as a pointer to the golden image it was created from. Although this is all shown as unallocated
space and needs manual parsing, some very helpful artifacts remain and can be
found.
A virtual machine was created that
had limited activity on it but with enough different items to look for. The following table depicts the activity on
the machine.
Time
|
Activity
|
5:09pm
|
Visited Msn.com using Internet Explorer (IE)
|
5:09pm
|
Visited Amazon.com using IE
|
5:10pm
|
Visited Google.com using IE
|
5:10pm
|
Ran MSPaint.exe
|
5:11pm
|
Saved a paint file – “findthis.png” to the desktop
|
5:12pm
|
Visited www.champlain.edu
|
6:10pm
|
Google search for “april fools jokes”
|
6:11pm
|
Visited dig4n6.blogspot.com
|
6:11pm
|
Saved file from website – xzibit_meme.png
|
6:11pm
|
Changed the file type of xzibit_meme.png to xzibit_meme.bmp
|
6:13pm
|
Created a file named Deleted Item and deleted it, removed it from the
recycling bin
|
6:18pm
|
Changed file type of xzibit_meme.bmp to xzibit_meme.jpeg
|
Due to the disk being all
unallocated space, the quickest way to determine if any information was still
recoverable on the drive was by doing simple keyword searches. Keyword
searches were executed for the following phrases:
“msn.com”, “amazon.com”, “google.com”,
“paint”, “paint.exe”, “findthis.png”, “findthis”, “efleisher”, “www.champlain.edu”,
“april fools jokes”, “dig4n6.blogspot.com”, “deleted item”, “xzibit_meme”.
One of the most intriguing and
important artifacts that was recovered were multiple entries from the Master
file table (MFT). These MFT entries
contain accurate time stamps and accurate information in regards to the files
that were created on the virtual machine.

Figure 27: MFT Entry for "findthis.png"
with accurate creation date
A search was done for the phrase
“FILE0” as this is a typical indicator of a MFT record. There were a total of 1457 hits in response
to this keyword. This is at least
indicative of 1457 MFT entries being present on this virtual disk. There were MFT entries present for each file
and folder that was created on the machine which will at least provide
information about some pertinent items on the machine.

Figure 28: Keyword results for MFT
Entry Header "FILE0"
The keyword search for the phrase
“april fools jokes” successfully pulled the Google search in plaintext from the
unallocated space as well.

Figure 29: Retrieved Google Search
A keyword search was done with a
username of “efleisher” to search for any data that may be relevant to what the
user was doing on the computer. Nearly
two thousand hits responded containing information primarily relating to
browsing history. The data was in a
plaintext readable format, with results being displayed in similar format to “efleisher@amazon.com”.

Figure 30: User Activity via
Username Search
This data provides the investigator
with insight into the users browsing history.
By manually parsing these entries, the investigator is able to ascertain
when the username was accessing certain websites. These time stamps can be found prior to the
website address. It will be stored in little
endian hex format and will be eight
bytes long.

Figure 31: Internet History
Timestamp Verification
Through keyword searches of
websites that were visited, an entry was found that revealed each website that
was browsed to. The order that these
websites were presented was in the reverse order that they were visited, with
the last website browsed to being the first website listed in the entry. It is potentially indicative of a file that
contained all web browsing history, similar to an index.dat file. Unlike most internet history entries,
however, there were no records of potential timestamp information.

Figure 32: Complete Browsing History
With the previous findings
presenting a plethora of internet history information, the next step was to try
an automated tool. Internet history
tools will attempt to perform an automated acquisition of the internet history
on a hard disk and present the findings to an investigator in an easy to read
format. Internet Evidence Finder v5 was
able to successfully parse and extract internet history, including cookies,
with accurate time stamps and user correlation.

Figure 33: Successful Internet
Evidence Finder Parsing of VHD
Further research into web browsing artifacts
provided HTML code for specific websites that were visited. This code provides a plaintext view of some
of the information that was on the webpage when it was visited by the user.

Figure 34: Plaintext HTML Code of
Webpage
An important and common artifact
that is looked at in a forensic investigation is deleted items. A deleted item can mean many things to an
investigator, such as an attempt to hide information, an attempt at removing
evidence, or perhaps merely an attempt at removing clutter. Both data recovery and forensic
investigations frequently deal with deleted items, thus making the ability to
recover them a desirable skill.
During this research, a text file
was created named deleted item. This item
was created on April 1st, 2013 at 6:13:07pm and immediately deleted afterwards
at 6:13:20pm. The keyword search for
this particular artifact provided multiple hits, including accurate timestamps
for the file creation time.

Figure 35: Accurate Timestamp of
Deleted Item Creation Time
When a file is deleted on a Windows
machine, it creates two files in the recycling bin that are associated with
it. These files are known as “$I” and
“$R” files. The $I file will contain the
original name and path of the file, along with its deletion date. The $R file will retain the actual data of
the file. When examining the evidence
near the location to the original file, the investigator will find references
to $I and $R files associated with the deleted item.

Figure 36: Discovery of Deleted Item
as well as $I and $R files
In order to recover the deletion
time of the file, it is necessary to obtain the creation time of the $I and $R
files. This timestamp can be recovered
by moving twenty bytes prior to the $ symbol and then obtaining the previous
eight bytes prior to that. If done
correctly, these eight bytes can be decoded in little-endian format to produce
the created time of both $I and $R files, therefore the deletion time of the
original file.

Figure 37: Accurate Timestamp of
Deleted Item Deletion Time
Perhaps the most interesting piece
of evidence left behind on the virtual hard disk was the resemblance to a
timeline of system activity. An entry
within the virtual hard disk depicted a chain of events that occurred on the
hard drive, including website visits, usernames, applications opening, files
being created, and a list of some of the values that would have been updated on
a system during the activity that occurred.

Figure 38: Entry reflecting Timeline
of Events
What would you
recommend my company to do?
Analysis of a Citrix Virtual
Desktop Environment requires a fair amount of setup behind the scenes in order
for it to be accomplished successfully.
Without the presence of snapshots, an investigator would be hard pressed
in finding any information that occurred on a pooled virtual machine. Although network monitoring tools could be
put in place that would monitor everything that occurs, these options are often
very costly and can still miss important artifacts. For a SMB or large business that is
implementing a VDI, it would be recommended that snapshots be scheduled of at
least the hard disk. Depending on
storage available, if both disk and memory snapshots are capable, more information
would be recoverable. This type of
snapshot would require high quantities of storage.
Through implementation of snapshots
and with appropriate administrative access, an investigator is able to manually
parse through virtual hard disk files that the Citrix VDI-in-a-Box
maintains. User information such as web
history, created files and folders, opened programs, Google searches, passwords,
deleted items, and master file table entries are all recoverable. This information may not be everything that
is needed to crack the case, but it is surely a huge stepping stone into
uncovering more information and perhaps even the “smoking gun.”
When looking at the vdiManager
virtual hard disk, the investigator is able to obtain information about when a
user is logging into a virtual desktop.
Using this and information from the domain controller, further research
needs to be done to be able to successfully link a specific user to a given
UUID. Doing this will allow for the
investigator to not need to sift through hundreds of hard drives for information,
and instead have immediate access to
which snapshots are linked to which users.
Doing so will provide for a streamlined investigative process in both
acquisition and analysis. Although this
is just the tip of the iceberg, there is without a doubt much more information
that can be uncovered. While access to
these servers and machines are no longer available, I hope to someday expand
this research, or at least see another professional take what has already been
done and expand upon it to allow for even more thorough analysis of Citrix
VDI’s in the future.
References
"Citrix XenServer
® 5.6 Feature Pack 1 Administrator's Guide." Citrix RSS. Citrix, 24
Mar. 2011.
Web.
“Create the First
Windows Image." Citrix EDocs. Citrix, 12 Feb. 2013. Web.
"Create a VM
Protection Policy." Citrix EDocs. Citrix, 26 Nov. 2012. Web.
Feller, Daniel.
"Machine Creation Services Primer – Part 1." Citrix Blogs.
Citrix, 28 June 2011.
Web.
Hochmuth, Phil.
"The Benefits Of Virtual Desktops." Forbes. Forbes Magazine, 12
Jan. 2010.
Web.
"Internet Evidence
Finder." Magnet Forensics. N.p., n.d. Web.
"Master Boot
Record." Master Boot Record. Microsoft TechNet, n.d. Web.
"NTFS Master File
Table (MFT)." NTFS Master File Table (MFT). N.p., n.d. Web
Powledge, Tom.
"Top 7 SMB Information Protection Predictions for 2013." Endpoint,
Cloud,
Mobile & Virtual
Security Solutions. Symantec, 4 Dec. 2012. Web.
Savitz, Eric.
"Citrix Shares Rally As Q4 Results Crush Street Estimates." Forbes.
Forbes Magazine,
30 Jan. 2013. Web.
Sweeney, Brandon.
"State of SMB IT Report – Equip Yourself with These Stats to Help Make
Vital IT
Decisions." VMware SMB Blog. VMware, 20 Feb. 2013. Web.